FAQ
general FAQs (CPU coolers retail)
Is the high weight dangerous for the CPU or socket?
Is it possible to cool my CPU without a fan (passive) using Noctua coolers?
I can't open the socket due to the mounting bars!
Does the package include a backplate for AMD AM2(+)/AM3(+)/FM1/FM2(+)?
I get a CPU fan error despite the fan is running!
How to remove the base protection cover?
How should I clean my Noctua cooler?
I’ve used all the NT-H1 thermal compound that came with the cooler, can you send me more?
I have difficulties installing the cooler, can you help?
Should I take the cooler off before transporting my system?
Are there any concerns using Noctua CPU coolers on Intel Skylake (LGA1151) CPUs?
My case supports CPU coolers of up to XXXmm height, which model should I choose?
You specify airflow in m³/h, how can I convert to CFM?
My Noctua PWM fan runs at a much higher minimum speed than advertised, what is wrong?
My Noctua PWM fan starts to spin when the PC boots but then stops, what is wrong?
I'm experiencing fan speed issues with my motherboard from Supermicro, what can I do?
Can I install a Noctua cooler in my system from Acer, Dell, HP or Lenovo?
Why doesn't the base of Noctua coolers have a polished, mirror like finish?
Can I register my Noctua product?
Can I keep using the backplate / mounting system of my previous Noctua cooler for my new one?
How much torque should be applied when tightening the screws of a Noctua CPU cooler?
Why doesn't the supplied backplate fit my LGA2066 / LGA2011 motherboard?
Which Noctua fan or CPU cooler should I buy? How to choose the right model?
Which Noctua CPU coolers are compatible with Intel LGA2066?
Can I upgrade my existing Noctua cooler to socket TR4 or SP3?
Is it possible to use the cooler with vertical graphic cards?
Which Noctua coolers are compatible with LGA1150?
My Intel CPU is running too hot although my heatsink supports the specified TDP, what's the problem?
Is the high weight dangerous for the CPU or socket?
Is it possible to cool my CPU without a fan (passive) using Noctua coolers?
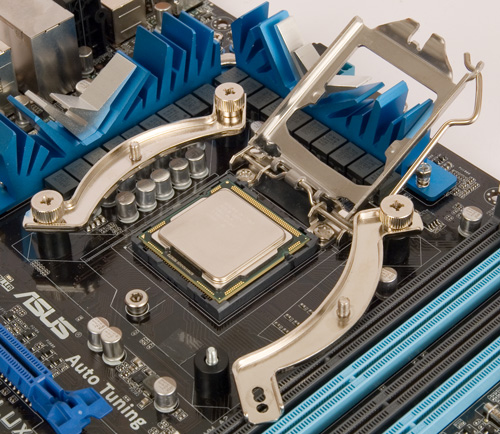
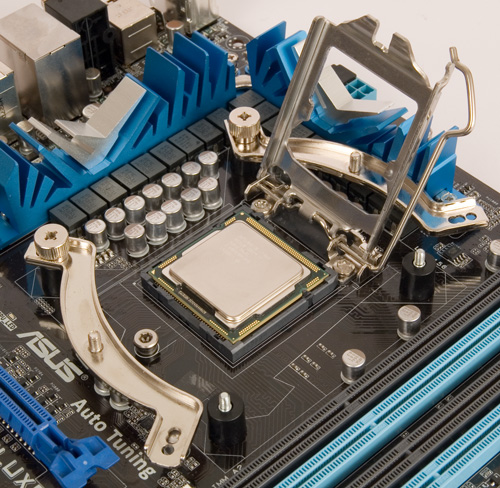
I can't open the socket due to the mounting bars!
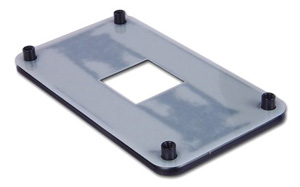
Does the package include a backplate for AMD AM2(+)/AM3(+)/FM1/FM2(+)?
I get a CPU fan error despite the fan is running!
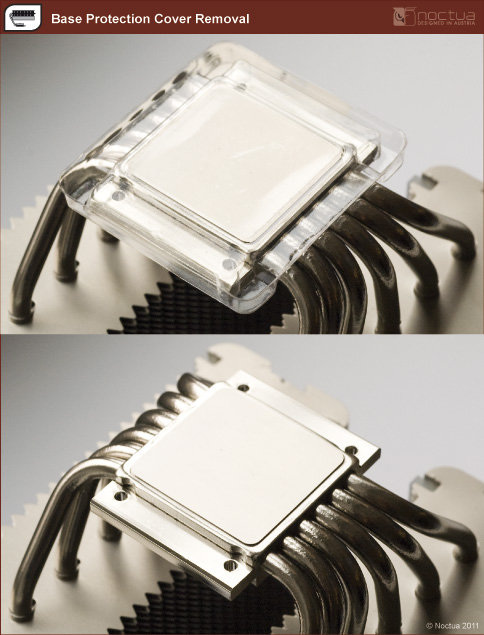
How to remove the base protection cover?
The base of Noctua CPU coolers is made from hard-wearing nickel plated copper, so there's nothing to worry about if you buy a Noctua cooler from second hand or if your cooler didn't come with a protection cover. Please proceed with the installation as explained in the manual.
You can simply remove the cover as shown below:
How should I clean my Noctua cooler?
Thermal paste residues: Whenever you take off the heatsink from the CPU, we recommend to clean the CPU as well as the base of the cooler before re-applying thermal paste and re-installing the cooler. You can either just wipe the base and the CPU clean with a dry, lint-free tissue or, for more thorough cleaning, use a lint-free tissue moistened with either a mild solution of washing-up liquid or isopropyl alcohol. Do not put the cooler or CPU under running water. Note that both the base of the heatsink and the CPU should be dry, free from residues of thermal compound and free from grease before re-applying thermal paste and re-installing the cooler.
I’ve used all the NT-H1 thermal compound that came with the cooler, can you send me more?
I have difficulties installing the cooler, can you help?
Should I take the cooler off before transporting my system?
Are there any concerns using Noctua CPU coolers on Intel Skylake (LGA1151) CPUs?
My case supports CPU coolers of up to XXXmm height, which model should I choose?
You specify airflow in m³/h, how can I convert to CFM?
My Noctua PWM fan runs at a much higher minimum speed than advertised, what is wrong?
- Many mainboards do not go below 40%, 50% or even 60% PWM duty cycle on case fan headers. Please refer to your mainboard manual to verify whether the fan header actually goes down to 20% duty cycle. If that's not the case, in some cases you can use the fan speed control software supplied with your mainboard to overcome these limitations and reduce the fan speed even further. However, 3rd party tools like SpeedFan offer greater flexibility and better options to work around the limitations imposed by the mainboard vendors.
- Some mainboards feature 4-pin fan headers that actually don‘t use a PWM signal on Pin 4 to control the fan speed but rather reduce the voltage on Pin 2 (like a standard 3-pin fan header). As the fan speed at minimum voltage is usually higher than the speed at 20% PWM duty cycle, the fan can not reach as low minimum speeds under voltage control as under PWM control. Please refer to your mainboard manual to check whether or not your mainboard has 4-pin fan headers that control the fan speed by reducing voltage on Pin 2 rather than by changing the PWM duty cycle on Pin 4:
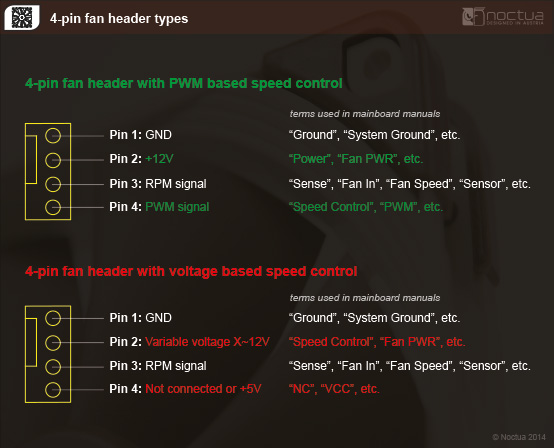
Note that mainboard manufacturers use different terms to indicate that Pin 4 is not being used for PWM control (e.g. “+5V”, “VCC” or “NC”), but if one of these terms is used, you can be sure that the fan header does not support PWM. If Pin 4 is described as “Speed Control” or “PWM” or the like, you can be sure that the fan header supports PWM.
Unfortunately, the description of Pin 2 is not always a clear indication as some manufacturers use terms such as “Fan PWR” or “Power” for both types of fan headers. However, if Pin 2 is described as “Speed Control”, you can also be sure that the fan header does not support PWM based speed control. If Pin 2 is described as “+12V”, this is a clear indication that the fan header supports PWM.
Please also note that in some cases, the descriptions of the pin layouts in the mainboard manuals may not be correct and some models actually allow you to switch the fan headers from voltage control mode to PWM control mode in the BIOS even though the pin descriptions do not indicate PWM support. We thus recommend to look for these options in the BIOS before taking other measures. In case of doubt, please contact your mainboard manufacturer.
If your mainboard features other 4-pin fan headers that use PWM for speed control, you can run multiple fans from these headers using Y-split cables. Make sure not to exceed the specified maximum power draw of the fan headers (usually 10-12W) though.
My Noctua PWM fan starts to spin when the PC boots but then stops, what is wrong?

Note that mainboard manufacturers use different terms to indicate that Pin 4 is not being used for PWM control (e.g. “+5V”, “VCC” or “NC”), but if one of these terms is used, you can be sure that the fan header does not support PWM. If Pin 4 is described as “Speed Control” or “PWM” or the like, you can be sure that the fan header supports PWM.
Unfortunately, the description of Pin 2 is not always a clear indication as some manufacturers use terms such as “Fan PWR” or “Power” for both types of fan headers. However, if Pin 2 is described as “Speed Control”, you can also be sure that the fan header does not support PWM based speed control. If Pin 2 is described as “+12V”, this is a clear indication that the fan header supports PWM.
Please also note that in some cases, the descriptions of the pin layouts in the mainboard manuals may not be correct and some models actually allow you to switch the fan headers from voltage control mode to PWM control mode in the BIOS even though the pin descriptions do not indicate PWM support. We thus recommend to look for these options in the BIOS before taking other measures. In case of doubt, please contact your mainboard manufacturer.
To resolve the issue, you can:
Choose a higher fan speed profile in the BIOS (e.g. „normal“ instead of „silent“, etc.) or deactivate automatic fan speed control and use a Low-Noise Adaptor instead.
Use the mainboard‘s fan speed control software or 3rd party tools like Speedfan to regulate the fan speed. Unlike BIOS based fan speed control, the supplied software usually checks whether the fan has stopped and increases voltage accordingly or at least offer more options to set up the fan properly.
If your mainboard features other 4-pin fan headers that use PWM for speed control, you can run multiple fans from these headers using Y-split cables. Make sure not to exceed the specified maximum power draw of the fan headers (usually 10-12W) though.
Is it a problem that the CPU heatspreader is not covered completely by the heatsinkbase on LGA2011-3?
I'm experiencing fan speed issues with my motherboard from Supermicro, what can I do?
The BIOS of many motherboard models from Supermicro expects a certain minimum fan speed (usually 600 or 700rpm), which is higher than the minimum fan speed that can be achieved with Noctua's PWM fan models. The BIOS may interpret the low minimum RPM of Noctua fans as a fan error and thus try to run the fan at 100% for a short period before going back to automatic control. This can result in oscillating fan speeds and fan speed warnings in the BIOS or the fan management console.
Unfortunately there is usually no option to set a lower minimum value in the BIOS that would suit the low minimum speed of Noctua PWM fans. The issue can thus only be resolved by either disabling automatic fan speed control in BIOS, which will cause the fans to run at a constant speed, by using 3rd party tools like IPMItool or IPMIutil, or by requesting a modified BIOS file from Supermicro, which takes the minimum fan speed of Noctua fans into account (charges might apply). Please note that any modifications performed with 3rd party tools are done at your own risk and that Noctua can not be held responsible for any possible issues.
Can I install a Noctua cooler in my system from Acer, Dell, HP or Lenovo?
Systems from Acer, Apple, Dell, HP, Lenovo or other major brands often use motherboards which differ slightly from the specifications issued by Intel and AMD. While those changes are usually subtle, they can lead to compatibility issues with coolers that were built to comply with these specifications.
Even in case the cooler is mechanically compatible and can be installed, other issues can occur, e.g. proprietary fan connectors, BIOS errors due to a low fan speed, shutdowns, etc. Some of these problems can be avoided with some technical knowledge, but especially BIOS related issues can often not be resolved.
Due to the large number of possible issues that cannot be resolved with different mounting parts alone, Noctua does not officially support systems from Acer, Apple, Dell, HP, Lenovo or other major brands.
Why doesn't the base of Noctua coolers have a polished, mirror like finish?
Can I register my Noctua product?
Can I keep using the backplate / mounting system of my previous Noctua cooler for my new one?
How much torque should be applied when tightening the screws of a Noctua CPU cooler?
| Screw type | Max. torque |
|---|---|
| NM-SSC1 screws for fixing the fastening brackets to the base of the heatsink | 0.5 Nm |
| NM-ITS1 thumb screws for fixing Intel mounting bars | 0.5 Nm |
| NM-ALS1 screws for fixing AMD mounting bars | 0.6 Nm |
| Spring-loaded screws for fixing the heatsink to the mounting bars | 0.6 Nm |
Why doesn't the supplied backplate fit my LGA2066 / LGA2011 motherboard?
The cooler's fans always run at full speed and can not be controlled by my motherboard, what's the problem?
Which Noctua fan or CPU cooler should I buy? How to choose the right model?
How can I determine if the motherboard’s UEFI BIOS is overclocking my processor by default and deactivate this automatic overclocking?
Most motherboard vendors allow their overclocking-enabled products (e.g. those with Intels X- or Z-series chipsets) to run the processor at increased clock speeds by default, without requiring any user action at all. Since TDP (Thermal Design Power) limits are usually also disabled by default, this leads to the CPU exceeding the rated TDP to a varying degree, depending on the used applications and their workloads. Due to the increased heat output of the CPU, you may see higher CPU temperatures than expected.
In order to find out if your motherboard is overclocking your processor by default, please enter the UEFI BIOS and select the “advanced” or “overclocking” menu. There you should be able to find options such as “MultiCore Enhancement” (options: enabled/disabled), “CPU Ratio Apply Mode” (options: all/per core) or similar. To disable the automatic overclocking, adjust the settings either to “disabled” or “per core” and make sure that the individual multipliers match the original specifications.
In doubt, please contact your motherboard vendor for detailed instructions on how to disable this feature.
My unlocked Intel CPU is running too hot although my heatsink supports the specified TDP, what's the problem?
- the TDP limits are extended or disabled in the motherboards' BIOS.
- the motherboard applies automatic overclocking by default, e.g. by raising the supply voltage of the CPU and using higher Turbo-Mode multipliers.
- some software creates untypical loads, e.g. Prime95 with AVX2 support and a) and/or b) apply.
This can lead to temperature issues, especially when using smaller coolers or compact cases.
The actual power draw of the processor can be monitored with software provided by the motherboard vendor or with 3rd party tools like HWInfo or HWMonitor.
If you encounter temperature issues (>90°C) and notice a higher than specified power draw, please ensure that no automatic overclocking is applied and limit the TDP to the specified value by choosing appropriate BIOS settings.
For Kaby Lake CPUs, it may also help to lower the CPU clock speed for applications that heavily use the AVX instruction set, which can lead to higher loads and power draw. This option is usually referred to as “AVX offset” and makes it possible to lower the multiplier specifically for AVX based applications without reducing performance when using other instruction sets. Depending on the quality of the CPU and the programs being used, a reduction of 2-3 steps usually gives very good results.
Please contact your motherboard vendor for details if you have trouble finding the appropriate settings in the BIOS.
All our TDP recommendations are based on thorough testing with the default values specified by Intel using popular applications such as Asus Realbench and prime95. Please note, however, that prime95 creates a particularly high load that goes beyond typical application scenarios and this leads to elevated temperatures. We thus recommend using other programs such as Realbench for checking the stability and temperatures of the CPU in realistic scenarios.
Which Noctua CPU coolers are compatible with Intel LGA2066?
Due to the heatsink mounting mechanism being identical on LGA2011 and LGA2066, Noctua’s SecuFirm2™ mounting systems for LGA2011 also support Intel’s LGA2066 processors. Most current Noctua coolers already include SecuFirm2™ mounting systems for LGA2011 and can thus be used on LGA2066 motherboards without any upgrades or modifications.
The following models include a mounting-kit for socket LGA2011/2066 and are thus compatible out of the box:
NH-C14S
NH-D14 SE2011
NH-D15
NH-D15 chromax.black
NH-D15S
NH-D9L
NH-D9DX i4 3U
NH-L12
NH-L12S
NH-L9x65
NH-U12A
NH-U12S
NH-U12S chromax.black
NH-U12DX i4
NH-U14S
NH-U9DX i4
NH-U9S
The following models can be made compatible with the LGA2011/LGA2066 sockets free of charge using the NM-i20xx upgrade-kit:
NH-C12P
NH-C12P SE14
NH-C14
NH-D14
NH-D15 SE-AM4
NH-U12S SE-AM4
NH-L9x65 SE-AM4
NH-U12
NH-U12F
NH-U12P
NH-U12P SE1366
NH-U12P SE2
NH-U9
NH-U9B
NH-U9B SE2
NH-U9F
The following models can be made compatible with the LGA2011/LGA2066 sockets using the NM-i20xx upgrade-kit but are not eligible for Noctua‘s free mounting offer, so users have to purchase the kit at local resellers:
NH-U12DO (Note that the A3 version is not compatible!)
NH-U12DX
NH-U12DX 1366
NH-U9DX 1366
NH-U9DO (Note that the A3 version is not compatible!)
The following models are not compatible with the LGA2011/LGA2066 sockets and can not be upgraded:
NH-L9a
NH-L9a-AM4
NH-L9a-AM4 chromax.black
NH-L9i
NH-L9i chromax.black
NH-U14S TR4-SP3
NH-U12S TR4-SP3
NH-U9 TR4-SP3
NH-U14S DX-3647
NH-U12S DX-3647
NH-D9 DX-3647 4U
NH-U12DO A3
NH-U9DO A3
Can I upgrade my existing Noctua cooler to socket TR4 or SP3?
Is it possible to use the cooler with vertical graphic cards?
Which Noctua coolers are compatible with LGA1150?
The following coolers can be made compatible to LGA115x using the NM-i115x Upgrade-Kit: NH-C12P, NH-D15 SE-AM4, NH-L9x65 SE-AM4, NH-U12, NH-U12F, NH-U12P, NH-U12P SE1366, NH-U12S SE-AM4, NH-U9, NH-U9F, NH-U9B.
The following coolers are mechanically incompatible with the NM-i115x Upgrade-Kit and can not be made compatible with LGA115x: TR4-SP3 coolers, DX-3647 coolers, DO-Series AMD Opteron coolers, NH-L9a, NH-L9a-AM4.
My Intel CPU is running too hot although my heatsink supports the specified TDP, what's the problem?
Current processors from Intel, especially the unlocked models with the suffixes C, K, X or XE (e.g. Core i7-8700K, Core i9-7900X oder Core i9-9900K) can dissipate noticeably more heat than indicated by the TDP specification.
While many motherboard models stick to the recommended power levels and clock speeds settings from Intel, there are models where the UEFI BIOS is configured in such a way that:
- the TDP limits are extended or disabled.
- the motherboard applies automatic overclocking by default, e.g. by raising the supply voltage of the CPU and using higher Turbo-Mode multipliers.
Depending on the load scenario and CPU configuration settings, the actual power draw can be 1.5-3 times as high the stated TDP value. This can lead to temperature issues, especially when using smaller coolers, compact cases or cases with poor airflow, when some applications create very high loads, e.g. Prime95 with AVX2 support, 3D-rendering or simulation software.
The actual power draw of the processor can be monitored with software provided by the motherboard vendor or with 3rd party tools like HWInfo or HWMonitor.
If you encounter temperature issues (>90°C) and notice a higher than specified power draw, please ensure that no automatic overclocking is applied. You might also want to limit the TDP to either the specified value by Intel or a value that is 5-10W below the value previously read out from the CPU. This can be done in BIOS by setting the “Long Term Duration Power” manually instead of “Auto”.
Furthermore, it may also help to lower the CPU clock speed for applications that heavily use the AVX instruction set, which can lead to higher loads and power draw. This option is usually referred to as “AVX offset” and makes it possible to lower the multiplier specifically for AVX based applications without reducing performance when using other instruction sets. Depending on the quality of the CPU and the programs being used, a reduction of 2-3 steps usually gives very good results.
The option to set an AVX-offset value is usually available for the following CPU generations:
- LGA1151:7th, 8th and 9th generation (Kaby Lake, Coffee Lake)
- LGA2011-3: 6th generation (Broadwell-E)
- LGA2066: 7th and 8th generation (Skylake-X)
Please contact your motherboard vendor for details if you have trouble finding the appropriate settings in the BIOS.
All our TDP recommendations are based on thorough testing with the default values specified by Intel using popular applications such as Asus Realbench and prime95. Please note, however, that prime95 creates a particularly high load that goes beyond most typical application scenarios and this leads to elevated temperatures. We thus recommend using other programs such as Realbench for checking the stability and temperatures of the CPU in realistic scenarios.
Please also note that CPUs that use thermal paste instead of soldering between the DIE and the heatspreader generally run hotter. Due to the thermal bottleneck created by the thermal paste, temperatures can be high even at the specified TDP.
Why is my Ryzen 3000 processor getting so hot? Why are Ryzen 3000 CPUs running hotter than previous generation Ryzen CPUs with the same TDP rating? Is there anything wrong with my cooler?
The latest Ryzen 3000 processors (except APU models) differ from previous Ryzen generations in that they are no longer based on a single, large chip but use a multi-chip approach with smaller chips instead. Depending on the exact model there can be one (6 and 8-core models) or two (12 and 16-core models) actual CPU-Dies (CCD) on the package. Each processor also uses an I/O-Die (IOD), which contains things like the memory controller, PCIe controller, connections to the motherboard chipset and other functions.
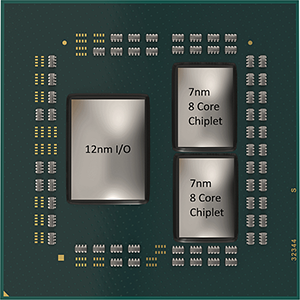
Because of this design change and the switch to a smaller 7nm manufacturing process, the heat distribution of the overall processor is much different from older 14nm and 12nm based single-chip Ryzen processors with a similar power draw.
Depending on the exact CPU model, its specified TDP value and possibly extended power limits (precision boost overdrive), a single CPU-die can create a heatload of up to 130W easily, whereas the I/O-die usually creates a heatload of about 10W. Due to the small size of the CPU-die, the heat density (W/mm²) of this chip is very high. For example, a 120W heatload at a chip-size of 74mm² results in a heat-density of 1.62W/mm², whereas the same heatload on an older Ryzen processor with a chip-size of 212mm² gives a heat-density of just 0.57W/mm².
This large difference in heat-density is the reason why newer Ryzen 3000 processors become much warmer at similar heatloads than their predecessors.
Furthermore, Ryzen 3000 CPUs are using the rated temperature headroom (up to 95°C) quite aggressively in order to reach higher boost clocks. As a result, it is absolutely no problem and not alarming if the processor runs into this temperature limit. The clock speed and supply voltage will be adjusted automatically by the processor itself in order to remain within AMD’s specifications and to prevent overheating.
Due to the higher heat density, higher thermal limits and more aggressive boost clock usage, it is perfectly normal that Ryzen 3000 CPUs are reaching higher temperatures than previous generation Ryzen CPUs with the same TDP rating. Higher CPU temperatures are normal for Ryzen 3000 processors and not a sign of that there is anything wrong with the CPU cooler.
There are claims that on Ryzen 3000 CPUs, the orientation of the heatpipes over the Dies leads to varying processor temperatures, is this true?
Your opinion matters!
We are excited to invite you to participate in our short website survey. It will only take 5 minutes of your time!


